
Kiwi and Mango Tart recipe- How to cook it beautifully?
Welcome to a little slice of paradise! If you’ve ever wished you could capture the feeling of a perfect, sun-drenched summer day and turn it into a dessert, then you’ve come to the right place.
This Kiwi and Mango Tart is more than just a recipe; it’s an experience. Imagine a buttery, crumbly crust that melts in your mouth, giving way to a luscious, creamy mango filling that’s bursting with tropical sweetness.
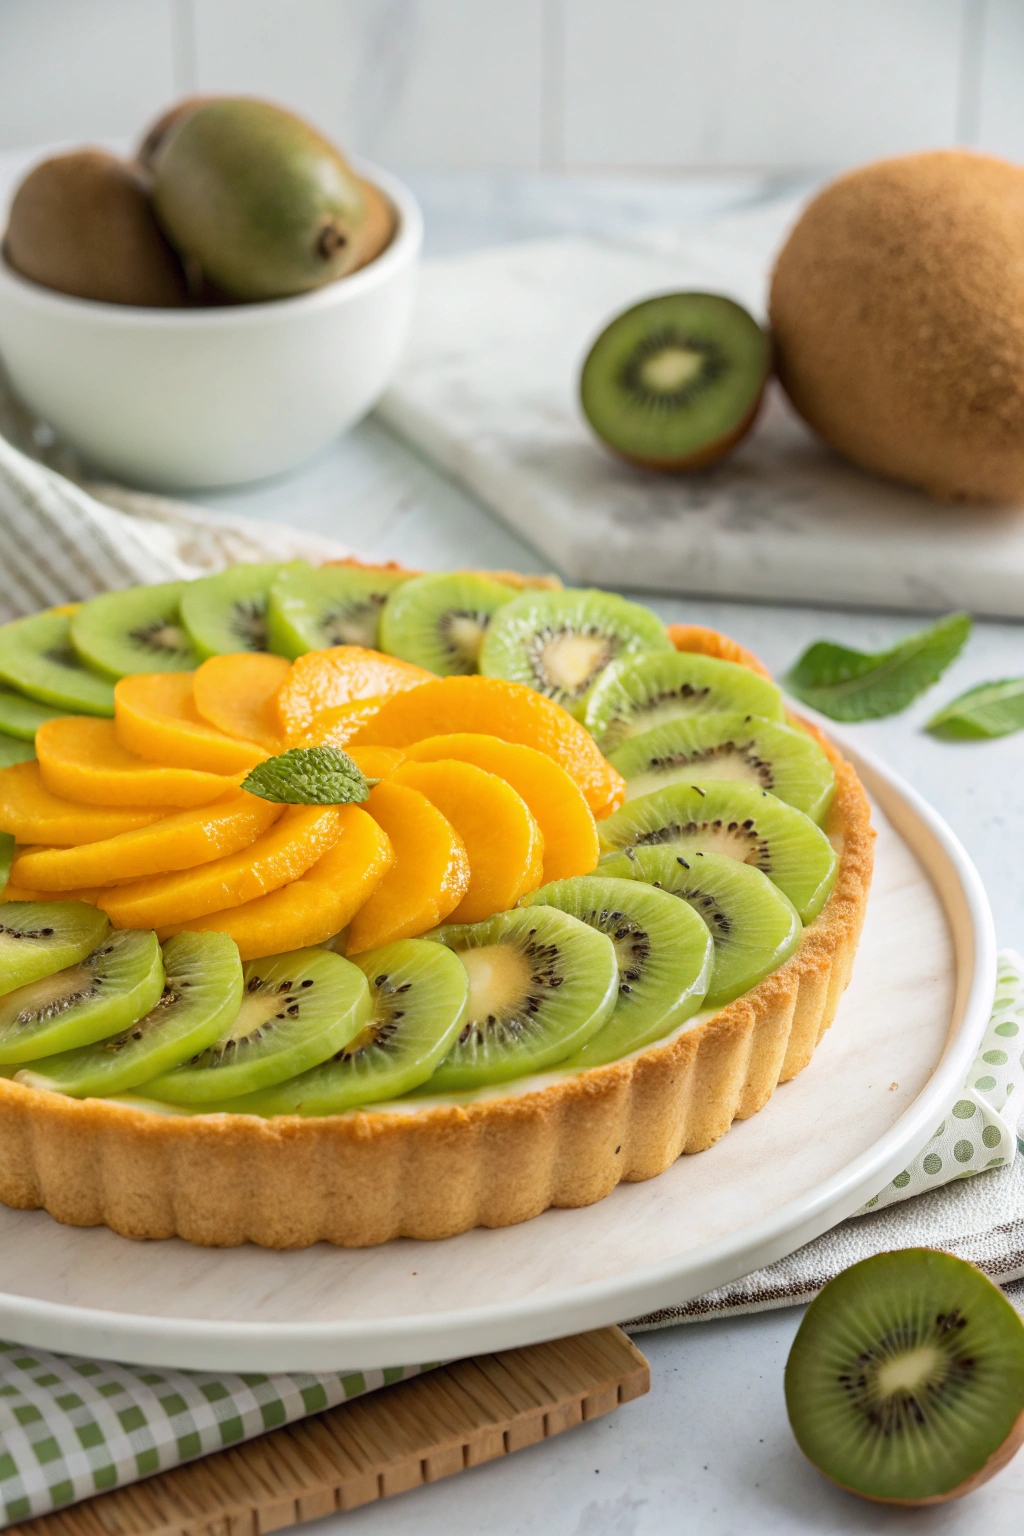
To top it all off, a vibrant mosaic of fresh, juicy kiwi and mango slices creates a stunning dessert that’s almost too beautiful to eat… almost!
This tart is a true showstopper, but here’s a little secret: it’s surprisingly easy to make. It’s the perfect recipe for impressing your friends and family at your next get-together, or simply for treating yourself to something special. So, let’s roll up our sleeves and bring a little sunshine into our kitchens!
Why You’ll Fall in Love with This Tropical Tart?
Get ready to be transported to a sunny, tropical paradise with every single bite of this Kiwi and Mango Tart. Seriously, this isn’t just another dessert; it’s a little slice of happiness on a plate. If you’re wondering what makes it so special, let me tell you – you’re about to fall head over heels for this recipe, and here’s why:
- A Burst of Freshness: Imagine the sweet, luscious flavor of a perfectly ripe mango melting in your mouth, followed by the bright, zesty tang of fresh kiwi. It’s a combination that’s pure magic! This tart is bursting with natural, vibrant flavors that feel like sunshine. It’s the kind of dessert that’s refreshing and satisfying all at once, without being overly heavy.
- The Perfect Crust: Let’s be honest, the crust can make or break a tart. And this one? It’s a winner. We’re talking a buttery, crumbly, and slightly sweet base that has the most satisfying little snap when you bite into it. It’s the perfect foundation for our creamy filling and fruity topping, and I’ll walk you through just how easy it is to make from scratch. Trust me, you’ll never want to go back to store-bought again!
- Surprisingly Simple: I know what you might be thinking – a tart that looks this good must be complicated to make, right? Wrong! I’ve designed this recipe to be as straightforward as possible. With clear, step-by-step instructions, even if you’re a beginner in the kitchen, you’ll be able to create this showstopper with confidence. It’s all about simple techniques and letting the beautiful ingredients shine.
- A Versatile Dessert for Any Occasion: Whether you’re hosting a summer barbecue, celebrating a special birthday, or simply need a little pick-me-up on a Tuesday afternoon, this tart is your go-to. It’s elegant enough to impress your guests, but so delicious and comforting that you’ll want to make it just for yourself. It’s a little ray of sunshine, no matter the occasion.
Your Kitchen Toolkit: Everything You Need for Tart Success
Before we dive into the deliciousness, let’s talk about setting ourselves up for success. Having the right tools on hand can make the entire baking process smoother, more enjoyable, and guarantee that your tart comes out looking as amazing as it tastes. Don’t worry, you don’t need a professional kitchen, just a few key items that will make all the difference.
Here’s what you’ll want to have ready:
- A 9-inch Tart Pan with a Removable Bottom: This is my number one must-have for any tart recipe. Why? That removable bottom is an absolute game-changer! It allows you to easily lift your finished tart out of the pan without any risk of breaking that beautiful crust you worked so hard on. It’s the secret to getting that clean, professional-looking presentation every single time. If you’re looking for a great one, this non-stick tart pan is a fantastic and reliable option.
- A Reliable Kitchen Scale: I can’t stress this enough – baking is a science! Using a kitchen scale to measure your ingredients, especially flour, ensures you get the exact right amounts every time. This leads to a perfectly consistent and tender crust, and it’s a small step that makes a huge difference in the final result.
- Food Processor or Pastry Blender: While you can definitely make the crust by hand, a food processor or a simple pastry blender makes the job of cutting the cold butter into the flour so much quicker and easier. It helps keep the butter cold, which is the key to a flaky crust.
- The Usual Suspects: Of course, you’ll also need the trusty basics that are probably already in your kitchen, like a set of mixing bowls, a whisk for the filling, and a spatula for scraping down the sides of the bowl.
The Stars of the Show: Your Ingredients
Great desserts start with great ingredients, and this tart is no exception. We’re using simple, fresh, and high-quality ingredients to create something truly special. Here’s a look at what you’ll need to bring this tropical beauty to life.
| For the Buttery Tart Crust | For the Creamy Mango Filling & Topping |
|---|---|
| 1 1/2 cups all-purpose flour | 2 large ripe mangoes, peeled and diced |
| 1/2 cup powdered sugar | 1/4 cup granulated sugar |
| 1/4 tsp salt | 1/4 cup heavy cream |
| 1/2 cup cold unsalted butter, cubed | 1 large egg |
| 1 large egg yolk | 1 tsp pure vanilla extract (a good quality one like this makes all the difference!) |
| 1-2 tbsp ice water | 3-4 ripe kiwis, peeled and sliced |
| 2 tbsp apricot jam, for glazing |
Let’s Get Baking: Your Step-by-Step Guide
Alright, are you ready to create some magic? This is where the fun really begins! I’ll walk you through each step of the process, and I promise it’s easier than you think. Just take it one step at a time, and you’ll have a stunning tart to show for it.
Crafting the Perfect Tart Crust
- Combine the Dry Ingredients: In a food processor, or a large mixing bowl, add your all-purpose flour, powdered sugar, and salt. Give it a quick pulse or a whisk to combine everything evenly.
- Cut in the Butter: Add your cold, cubed butter to the flour mixture. Pulse in the food processor (about 10-12 one-second pulses) or use a pastry blender to cut the butter in until the mixture resembles coarse crumbs with some pea-sized pieces of butter still visible. Those little butter pockets are what will make our crust flaky and delicious!
- Add the Egg Yolk and Water: In a small bowl, lightly whisk your egg yolk with one tablespoon of ice water. Drizzle this over the flour and butter mixture and pulse or mix until the dough just starts to come together. If it seems too dry, you can add one more tablespoon of ice water, but be careful not to add too much!
- Chill the Dough: Turn the dough out onto a clean surface and gently press it into a flat disk. Wrap it tightly in plastic wrap and let it chill in the refrigerator for at least 30 minutes. This step is super important as it lets the gluten relax and makes the dough easier to work with.
- Press it into the Pan: Once chilled, unwrap your dough and press it evenly into the bottom and up the sides of your 9-inch tart pan. You can use your fingers or the flat bottom of a measuring cup to get it nice and even. Trim any excess dough from the top edge.
- Blind Bake the Crust: Preheat your oven to 375°F (190°C). Prick the bottom of the crust with a fork, line it with parchment paper, and fill it with pie weights or dried beans. Bake for 15-20 minutes, then carefully remove the parchment paper and weights and bake for another 5-7 minutes, or until the crust is a beautiful light golden brown. Let it cool completely before you add the filling.
Whipping Up the Luscious Mango Filling
- Puree the Mangoes: While your crust is cooling, it’s time to make the star of the show! Add your diced mangoes to a blender or food processor and blend until you have a smooth, silky puree.
- Combine the Goodness: In a medium bowl, whisk together the mango puree, granulated sugar, heavy cream, egg, and that lovely pure vanilla extract. Keep whisking until everything is well combined and smooth.
Assembling and Baking Your Masterpiece
- Fill and Bake: Pour your creamy mango filling into the cooled tart crust. Carefully place the tart on a baking sheet and bake at 350°F (175°C) for 25-30 minutes. The filling should be set around the edges and only have a slight jiggle in the center.
- Cool it Down: This is probably the hardest part – waiting! Let your tart cool completely on a wire rack. This will take at least an hour, but it’s crucial for the filling to set up properly.
- Decorate with Fresh Fruit: Once the tart is cool, it’s time to get creative! Arrange your fresh kiwi and mango slices on top in any pattern you like. You can create circles, stripes, or just a beautiful, rustic pile of fruit.
- Add a Little Shine: In a small saucepan, gently heat the apricot jam with a teaspoon of water until it’s melted and smooth. Use a pastry brush to lightly brush this glaze over the fresh fruit. This not only adds a beautiful, glossy shine but also helps keep the fruit looking fresh. And there you have it – your stunning, homemade Kiwi and Mango Tart is ready to be devoured!
Pro Tips from My Kitchen to Yours
Over the years, I’ve learned a few little tricks that can take a good tart and make it absolutely fantastic. I want to share them with you so you can feel like a total pro in your own kitchen! Here are some of my favorite tips:
- Choosing Your Fruit: The secret to a truly delicious fruit tart is, you guessed it, the fruit! When picking your mangoes, look for ones that have a slight give when you gently press them. They should also have a sweet, fruity aroma at the stem. For the kiwis, you want them to be firm but not rock-hard. A little softness means they’re ripe and ready to eat!
- Don’t Overwork the Dough: This is a golden rule for any pastry. When you’re mixing the crust, stop as soon as the dough comes together. Overworking it develops the gluten in the flour, which can lead to a tough, chewy crust instead of a tender, crumbly one. Handle it gently and as little as possible.
- Blind Baking is Key: I know it might seem like an extra step, but don’t skip blind baking the crust! This process of pre-baking the shell ensures that the bottom of your tart is perfectly crisp and golden. It prevents the dreaded “soggy bottom” that can happen when you pour a wet filling into an unbaked crust.
- Get Creative with Your Topping: While I love the classic look of sliced kiwi and mango, feel free to let your inner artist shine! You can create beautiful concentric circles, a fun chevron pattern, or even a mosaic-style topping. You could also add some other tropical fruits like passion fruit seeds or a sprinkle of toasted coconut for extra texture and flavor.
- Make-Ahead Magic: Life can get busy, I totally get it! The great news is that you can prepare parts of this tart in advance. The tart dough can be made and kept in the fridge for up to two days. You can also bake the crust a day ahead and store it in an airtight container at room temperature. This way, on the day you want to serve it, you just have to make the filling and assemble!
Storing Your Tropical Treasure
So you’ve made this beautiful tart… now what? If you’re lucky enough to have any leftovers, you’ll want to store it properly to keep it tasting fresh and delicious.
Your beautiful Kiwi and Mango Tart is best enjoyed on the day it’s made, especially because of the fresh fruit topping. However, if you need to store it, simply cover it loosely with plastic wrap or place it in an airtight container. It will keep well in the refrigerator for up to two days. Just be aware that the crust may soften a little bit over time, but the flavors will still be absolutely wonderful.
Your Questions, Answered: FAQs
I know you might have a few questions, and I’m here to help! Here are some of the most common questions I get about this recipe:
- Can I use a store-bought crust?
- Absolutely! If you’re short on time, a store-bought pie or tart crust is a great shortcut. Just be sure to follow the package instructions for pre-baking it before you add the filling.
- Can I use other fruits?
- Of course! This tart is incredibly versatile. Feel free to get creative and use whatever fruits are in season. Berries like strawberries, raspberries, or blueberries would be delicious. Peaches or plums would also be wonderful in the summer.
- Can I make this tart gluten-free?
- Yes, you can. To make this tart gluten-free, simply substitute the all-purpose flour in the crust with a good quality gluten-free all-purpose flour blend. Look for one that contains xanthan gum, as this will help with the structure of the crust.
- My crust shrunk! What did I do wrong?
- Don’t worry, this is a common issue! Crust shrinkage is usually caused by one of two things: the dough being overworked, or not chilling it for long enough. Be sure to handle the dough gently and let it chill in the fridge for at least 30 minutes before pressing it into the pan. This gives the gluten time to relax and helps prevent it from shrinking in the oven.
A Sweet Farewell
And there you have it – your very own, absolutely stunning Kiwi and Mango Tart! I hope you’ve enjoyed this little baking adventure as much as I have. There’s something so special about creating a dessert that’s not only beautiful to look at but also bursting with fresh, vibrant flavors. It’s a little taste of sunshine that’s perfect for sharing with the people you love, or for enjoying all by yourself (I won’t tell!).
I would be absolutely thrilled to see your beautiful creations! If you make this tart, please feel free to share a photo and tag me on social media. Happy baking, my friends!